Integration Guides/ Manuals
-
- Identity Provider (IdP): The Foundation of Sastrify Insights
- Uncover SaaS Usage and Shadow IT with Identity Provider (IdP) Discovery
- Integrating HRIS to Enrich Identities & Insights
- Admin Guide: Deploying the Sastrify Chrome Extension
- Admin Guide: Deploying the Sastrify Microsoft Edge Extension
- Manual Installation Guide: Sastrify Chrome Browser Extension
- Manual Installation Guide: Sastrify Edge Browser Extension
- Setting renewal dates & reminders
- Assigning & Modifying Subscription Owners
- Uploading & Managing Your SaaS Documents in Sastrify
- Sastrify App Support: Get Help & Give Feedback
- Sastrify's commitment to security and privacy standards
- Integrating HRIS to Enrich Identities & Insights
-
- Capturing Subscription Details with Contract AI
- Adding a New Subscription Manually
- Slack Integration: Bringing Sastrify into Your Internal Communication
- How to bulk upload your invoices
- Automating Document Uploads via Email Forwarding
- Managing Your Notification Preferences
- Tools and Spend Importer: Bulk Upload & Visualization
- Tool Matching: Aligning ERP Data with Your Inventory
- Managing Collaboration with Custom Tasks
- Task Automation: Standardizing and Automating Routine Actions
-
- Workflows: Automate procurement processes with consistency
- Requests: Streamline procurement process and internal approval
- Get Procurement Support for New Purchases and Renewals
- How to submit and track Procurement Requests via Jira Integration
- Scope of service: Custom benchmarking & contract review
- Scope of service: Negotiation & renewal support
- Scope of service: Custom SaaS Optimization Advisory
- Purchase your SaaS through the SastriMarket
-
- Connecting Your ERP & Accounting Software
- Spend Import: Validate and fine-tune your imported spend data
- Export spend data from Candis to Sastrify
- Export spend data from Spendesk to Sastrify
- Export spend data from Pleo to Sastrify
- Export spend data from Moss to Sastrify
- Export spend data from DATEV to Sastrify
- Export spend data from Ramp to Sastrify
-
- Configuring Authentication & Access
- User Management: Managing Users and Platform Roles
- Configuring Microsoft SSO Authentication
- Configuring Okta SSO Authentication
- Configuring JumpCloud SSO Authentication
- Configuring Cisco Duo SSO Authentication
- Configuring Cloudflare SSO Authentication
- Configuring OneLogin SSO Authentication
- Having trouble logging in?
- Understanding user roles and permissions
-
- Okta M2M Integration Guide
- Accounting & ERP: Connecting NetSuite to Sastrify
- Accounting & ERP: How to connect Quickbooks
- Accounting & ERP: How to connect Microsoft Dynamics 365
- Accounting & ERP: How to connect Workday ERP
- Accounting & ERP: How to integrate Pleo with Sastrify
- HRIS: Connecting Officient to Sastrify
-
- ERP & Accounting Integration FAQs
- SSO / IDP Discovery Integration FAQs
- Browser Extension FAQs
- HRIS Integration FAQs
- Usage Analytics FAQs
- Contract AI & Subscription Details FAQs
- Tools and Spend Importer FAQs
- Invoices FAQs
- Achieved Savings FAQs
- Form component guide for Sastrify form builder
- What is SaaS and Sastrify's scope of work?
- Who receives the renewal alerts or reminders?
- How does Sastrify work with currencies?
- Is the spend data from accounting export always up-to-date?
- How to work with benchmark prices
- When and how to involve Sastrify in a contract evaluation or negotiation?
- How does Sastrify interact with SaaS vendors?
- How do you handle confidentiality clauses in vendor contracts?
- Why is contract data essential for benchmarking and negotiation support?
Okta M2M Integration Guide Print
Modified on: Wed, 29 Apr, 2026 at 4:16 PM
Connecting Okta to Sastrify as your Identity Provider (IdP) is a foundational step that enables automated insight tracking and identity management. This guide covers the API Service Integration method to link the two platforms.
IN THIS ARTICLE
- Prerequisites
- Supported Scopes
- Step 1: Open the Okta integration setup page in Sastrify
- Step 2: Authorize Sastrify in Okta
- Step 3: Retrieve Credentials
- Step 4: Finalize the Connection in Sastrify
Prerequisites
Before configuring the Okta integration, ensure the following:
- A Sastrify account with an Admin permission to manage integrations
- An Okta account with admin access to authorize API service integrations
Supported Scopes
The Sastrify Okta integration requests the following OAuth 2.0 scopes:
| Scope | Description |
| okta.users.read | Read user profiles to import employee identities and track access across your organization. |
| okta.apps.read | Read the list of applications in your Okta tenant to discover software in use and identify Shadow IT |
| okta.logs.read | Read system logs to track application usage patterns, frequency, and user activity |
Step 1: Open the Okta integration setup page in Sastrify
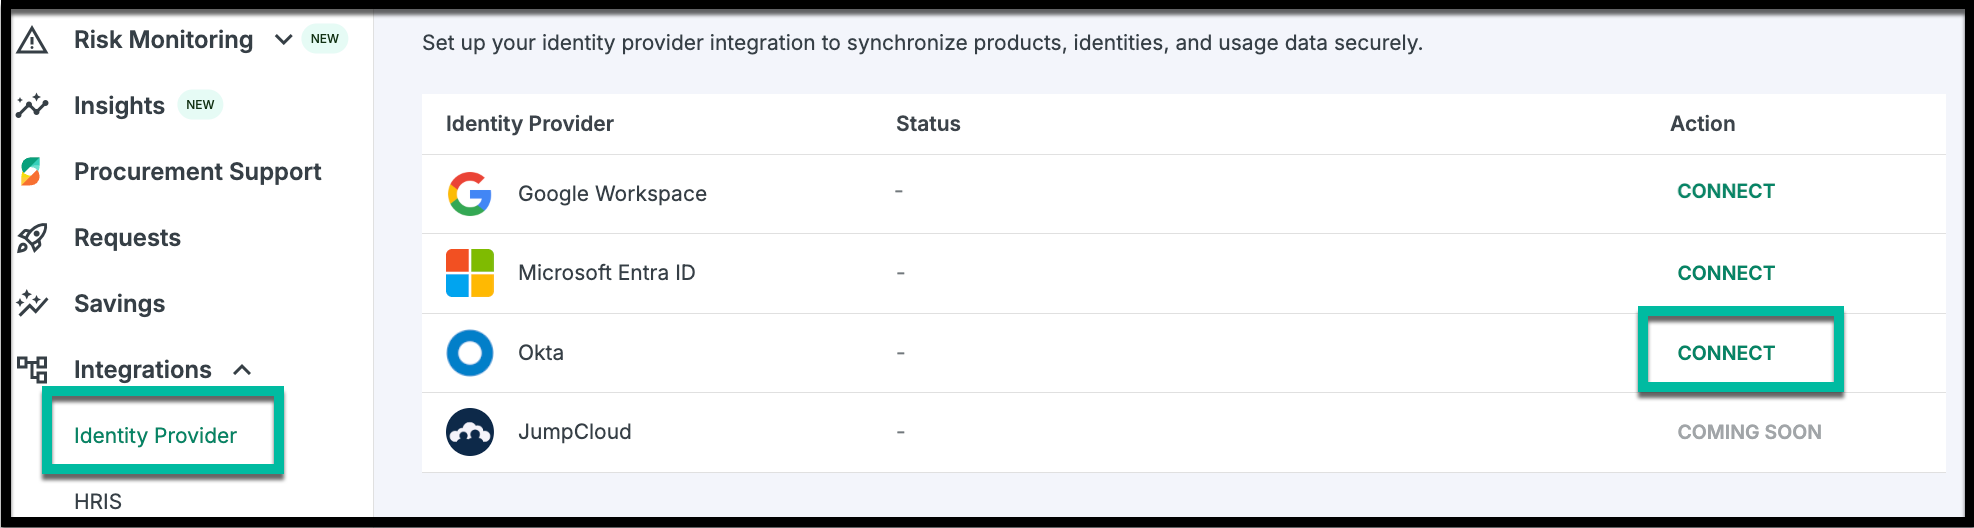
- Log in to your Sastrify platform.
- Navigate to Integrations > identity Provider.
- Locate the Okta card, and click Connect.
- A setup page will open, displaying the required configuration details and input form.
Step 2: Authorize Sastrify in Okta
- Log in to your Okta Admin Console.
Navigate to Applications > API Service Integrations.
Click the Add Integration button.
Search for and select Sastrify Insights from the list of available integrations.
Review the requested permissions (scopes) and click Install & Authorize.

Step 3: Retrieve Credentials
Once authorized, Okta will display your Client Secret.
- Copy this immediately, and click Done.
- Copy the Client ID and the entire Okta Domain (the full URL) as shown.
Step 4: Finalize the Connection in Sastrify
Return to the Okta setup form in your Sastrify platform.
Domain: From the Okta domain URL you copied earlier, enter the domain part (e.g., okta.com) in the top field.
Subdomain: Take only the unique prefix before .okta.com and enter it as your Okta Subdomain.
Input the Client ID and Client Secret into their respective fields.
Click Connect to finalize the integration.

Did you find it helpful? Yes No
Send feedback